Recipe- Homemade Dressing for The BEST Asian Chicken Salad

Click to link for purchasing info for Okami Chinese Chicken Salad Kit

A couple stores around here sell a chicken salad kit by Okami with all you need for a delicious meal in one box, minus the lettuce. The sliced almonds, two kinds of crispy noodles, cooked chicken strips, (there used to be orange segments, too), and the best part- a really good salad dressing with Asian flavors. One store sells a double package that we can never finish (Costco) and the other store is out of my way.

But I love this salad…

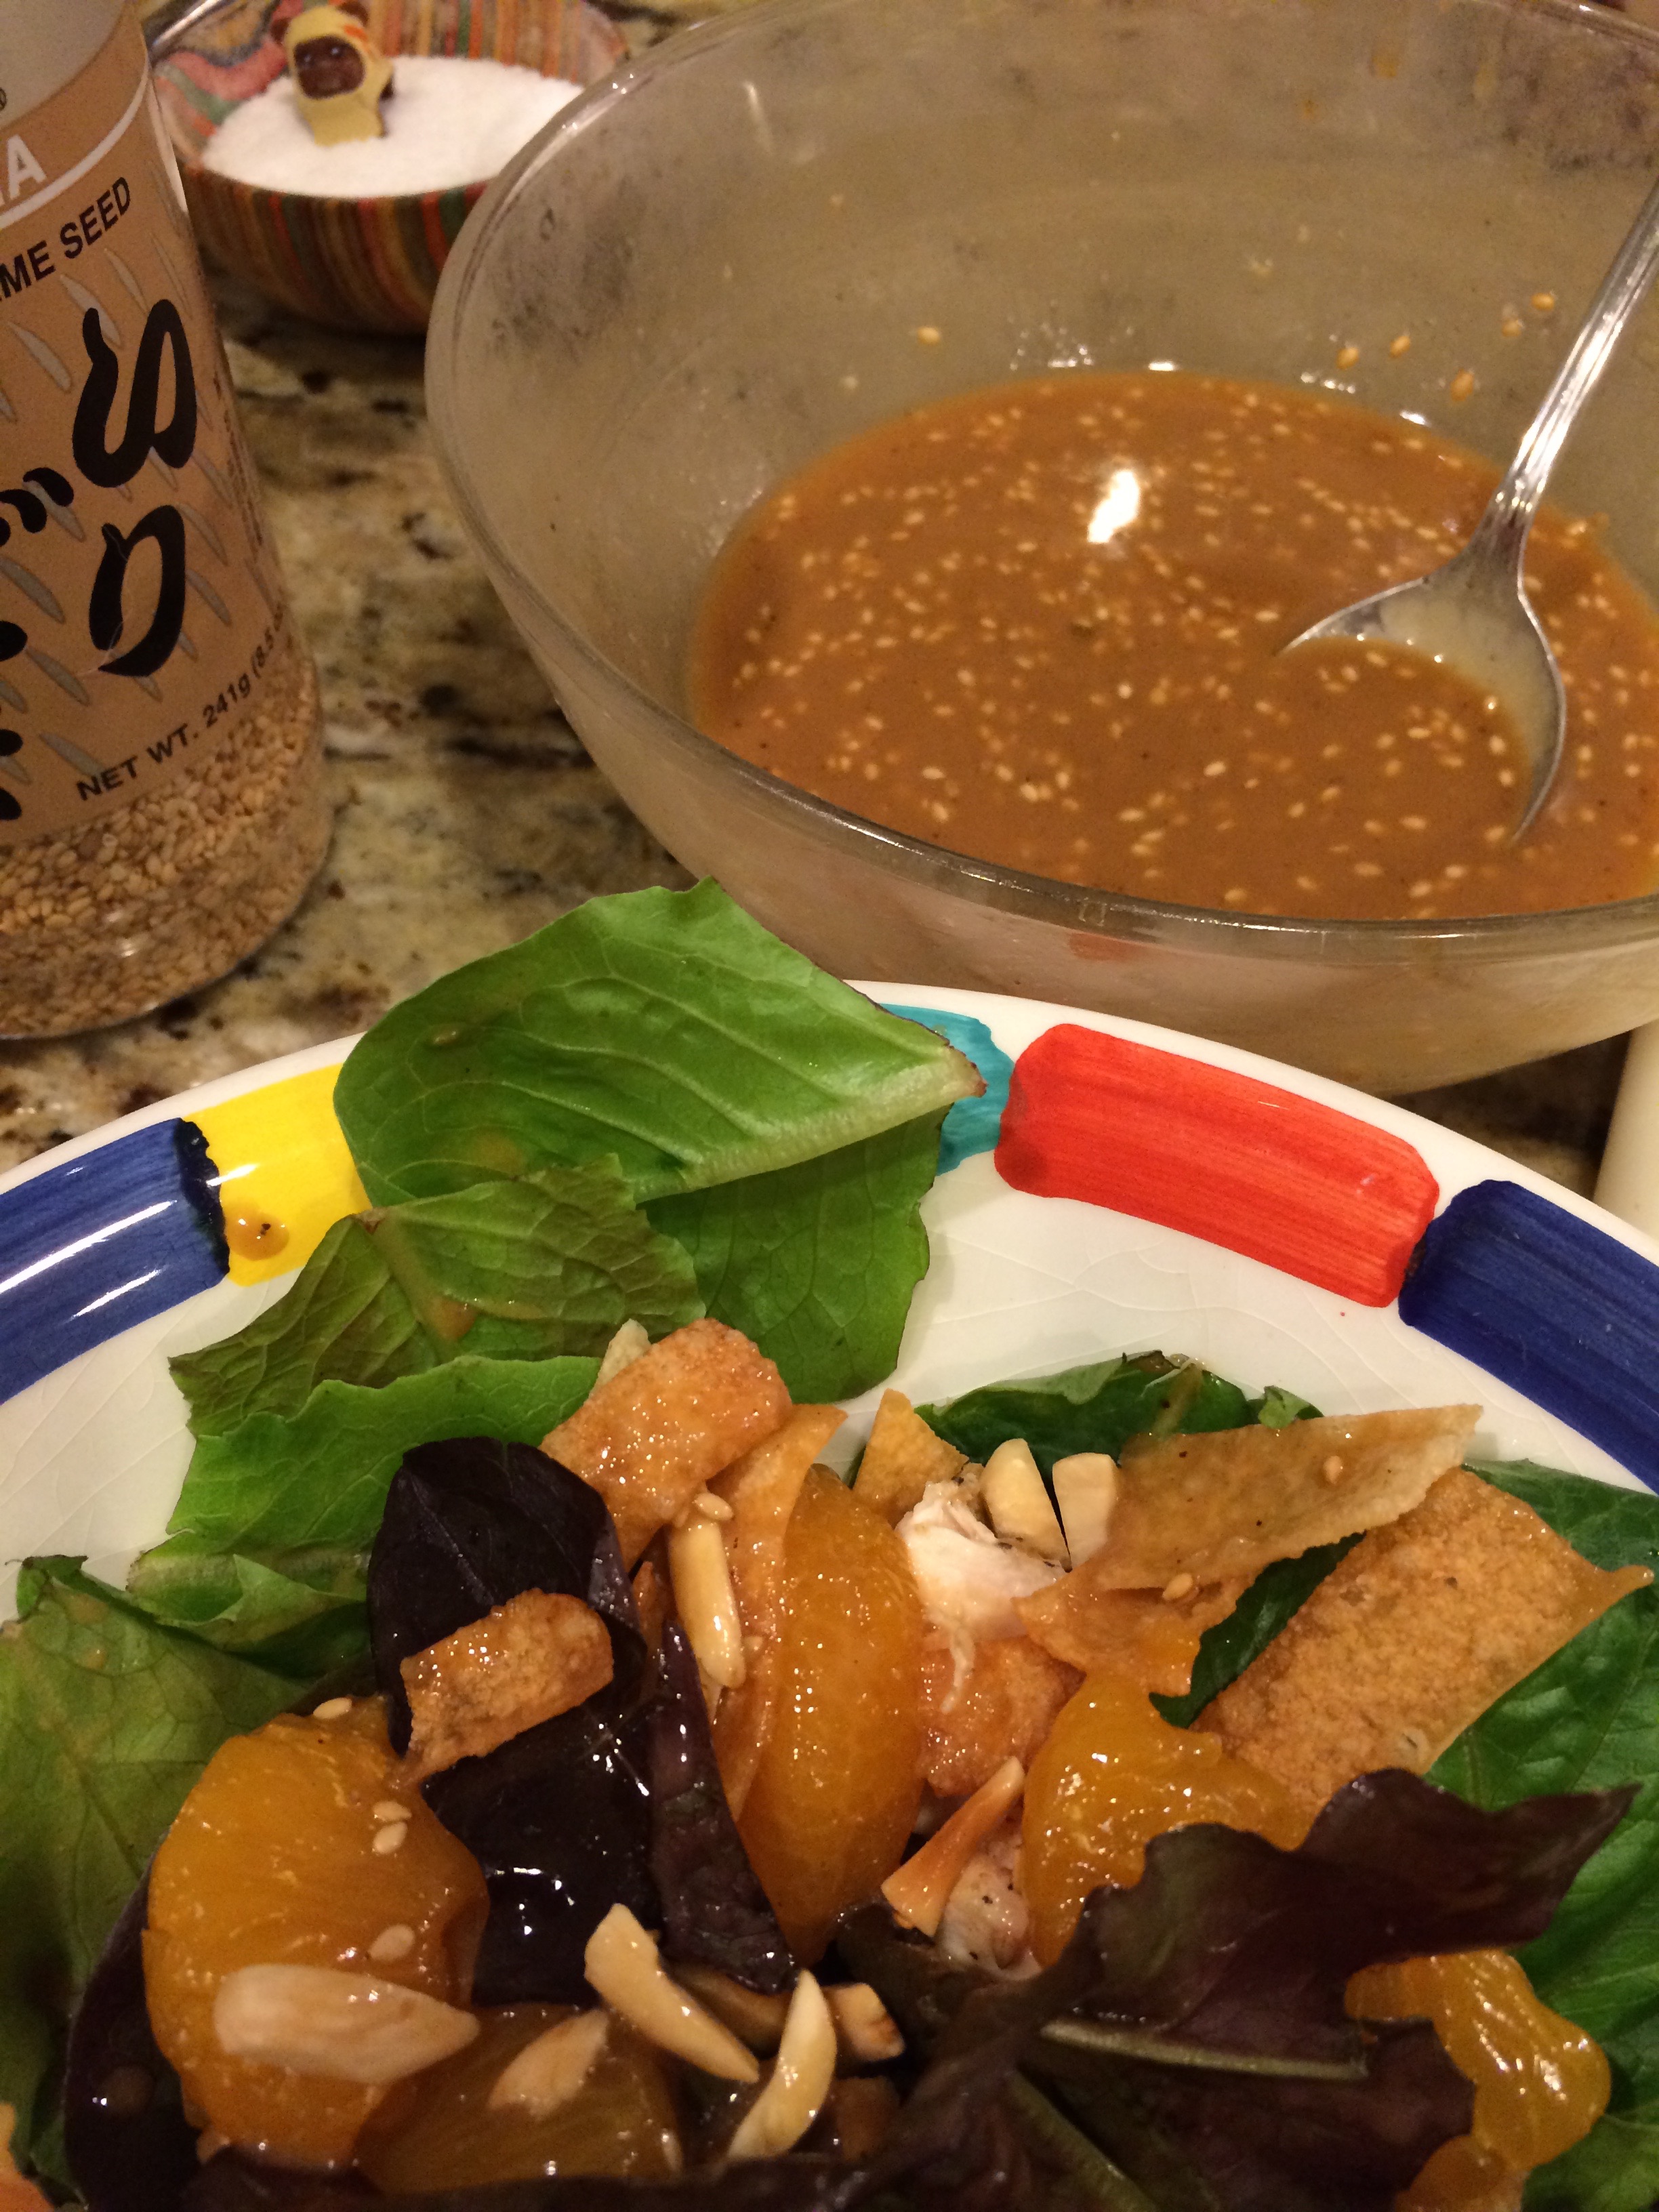
The only solution: make my own. I figured I could do a better job on the chicken, too, and reduce some of the unnecessary junk found in the dressing, too. Lucky me, The Food Network came through with a dressing that after a few tweaks, was really close to the Okami kit. The special ingredient is tahini- the sesame paste you put in your hummus. The original recipe that inspired some of the ingredients and amount can be found here, on FoodNetwork.com, my changes included the soy sauce and honey, and using a combination of toasted sesame oil and peanut oil- all sesame would be quite overpowering, if it is a toasted oil.

IMG_7652
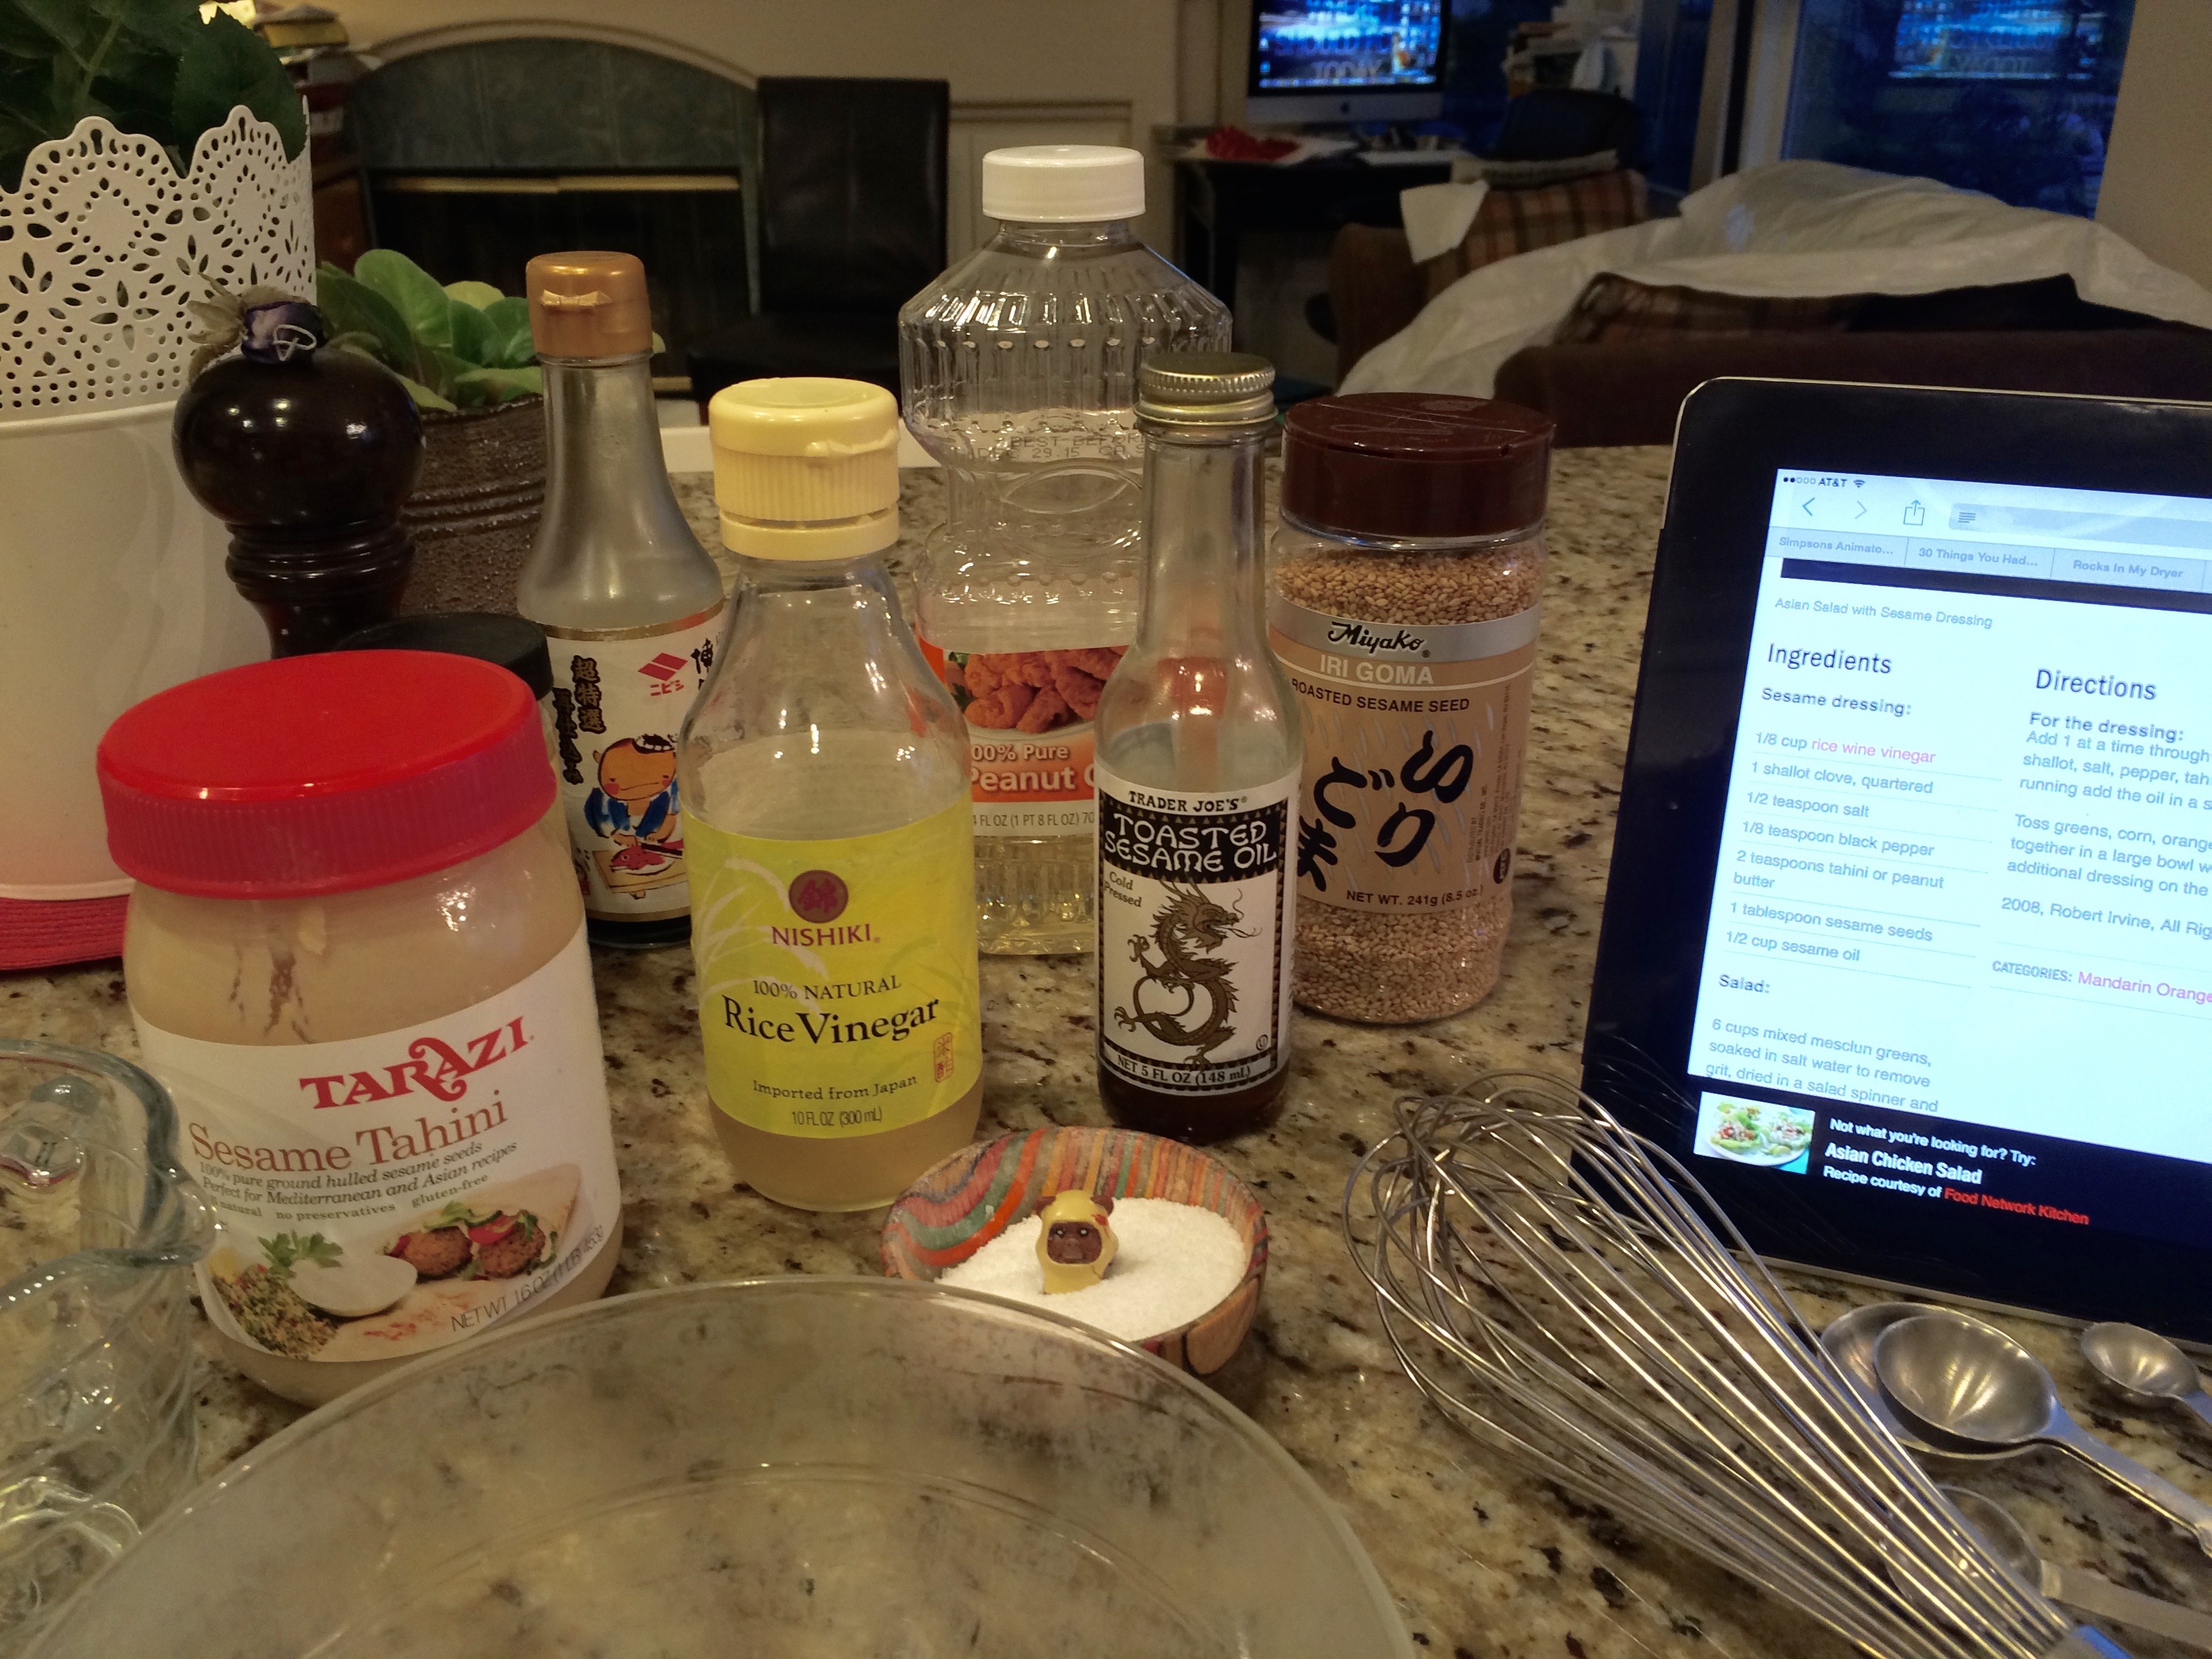
Asian Salad Dressing

  • 3 tablespoons rice wine vinegar
  • 1 small clove of garlic, crushed
  • pinch of salt
  • 1/4 teaspoon ground pepper
  • 1 tablespoon tahini paste
  • 1 tablespoon toasted sesame seeds
  • 2 tablespoons toasted sesame oil
  • 1/3 cup peanut oil
  • 1 tablespoon soy sauce
  • 1 tablespoon honey

Whisk all ingredients together, that’s it! Drizzle about two tablespoons over 3 cups of salad greens. Suggested salad should include chopped chicken, Mandarin orange segments, toasted sliced almonds, and fried chow mein noodles or won ton strips.

And yes, the chicken was a lot better than the salad kit. I just took boneless breasts, sprinkled them with onion and garlic powders, salt and pepper, and grilled them for about four minutes per side. May take three minutes per side, don’t overcook.
KEY STEP: let the chicken rest for 15 minutes, and you will end up with the juiciest and most tender boneless white meat you’ve ever cooked.

Go make this, save money, get more real foods into your happy mouth and enjoy this soon.

IMG_7653

Home Made Cherry Almond Granola with Chia and Pine Nuts- So Good!

FitChickSD.com
FitChickSD.com

The Husband found a super-delicious bag of granola being sold at the bike shop recently- Fit Chick may be pricy, but is definitely worth every penny. It’s delicious. Click the picture (swiped from the Fit Chick web site) to connect with ordering info if you are so inclined…

I’ve been meaning to try a granola recipe that I found and squirreled away on Pinterest, and now I have a great model to imitate- I used a recipe from Cook’s Illustrated, tweaked the ratios to make a smaller batch, and added chia seeds and pine nuts to come close to the Fit Chick bag o’ goodness.

Here’s how it went down…

IMG_7634
Ingredients…

Cherry Almond Granola

makes just over 4 cups

  • 1/4 cup maple syrup
  • 1/4 cup brown sugar
  • 2 teaspoons vanilla extract
  • 1/2 teaspoon almond extract
  • 1/4 teaspoon kosher salt
  • 2 tablespoon coconut oil
  • 2 tablespoon canola oil
  • 3 cups old fashioned rolled oats
  • 1 cup whole almonds, chopped roughly
  • 1/4 cup pine nuts
  • 2 tablespoons chia seeds
  • 1 cup dried cherries

Mix together the first seven ingredients (syrup through the oils). Mix in the oats, almonds, pine nuts and chia seeds. Press into a 13″ x 18″ half sheet baking pan (or a cookie sheet) and bake at 325 degrees for 40 minutes. Watch that the granola doesn’t get too browned! Let cool slightly, break into chunks, mix in the cup of dried cherries and try to keep yourself from eating it all in one sitting.


Patted into pan...
Patted into pan… I’d leave the cherries out until after it has baked, next time.
Finished granola.
Finished granola.

This was another “Holy Yum” recipe. If I were to rank it, it would be worthy of an 11 out of 10, à la Spinal Tap.


11/18/17 Update: I’ve continued to make and share this awesome recipe, and started adding 1/2 teaspoon of ground cardamom. Wow, is that a great addition! Another change I’ve made in the recipe is to increase the coconut and canola oil from 1 1/2 tablespoon, each, to two tablespoons, each. I think it needed a bit more of the oil to help keep everything together. And I also realize now that when you bake dried fruit in a granola, the fruit turns into little tough rocks. That’s not good. I’ve learned to mix the fruit in at the end!

World’s Best Pie Crust (and Bonus Peach Cobbler Recipe, woo hoo!)

What is this? How can someone make such brazen culinary claims? The audacity!

No, really. This recipe solves a few problems that stand between you and pastry goodness, such as:

  1. Water + flour = gluten (tough crust)
  2. six ingredients, real foods
  3. really fast, easy, little work, less mess!

Food Chemistry Lesson!
When you mix flour with water, you create gluten strands. You want bread to develop a lot of gluten, bread gets a lot of kneading. Gluten makes great bread, but tough biscuits and pie crusts. Pastry dough should be moved around as little as possible.

Trader Joe's, cheap and good!
Trader Joe’s, cheap and good!

This recipe hinges on using your food processor, really cold butter, and one secret ingredient: vodka.

World’s Best Pie Crust Recipe (adapted from Alton Brown)
(for single crust)

Ingredients ready...
Ingredients ready…

1 cup flour
1 tablespoon sugar
1/2 teaspoon salt
1 stick very cold butter (8 tablespoons)
1/4 cup vodka and ice water mix
(A couple of green olives, optional)

-Into your food processor bowl add the flour, sugar and salt and give them a couple hits of the mix button.
-In a graduated measuring cup, pour in 1/4 cup of water, add another 1/4 cup of vodka (now you have 1/2 cup of liquid), then add ice cubes to top it off up to the 3/4 cup line; none for the baker, yet… you have to wait a couple more minute.

Dough looks done!
Dough looks done!

-Cut butter into small cubes and add to dry mixture, pulse in the processor until the chunks of butter are rice or pea sized.

-Now you are ready to add only 1/4 cup worth of your water/vodka/ice… be honest, your cocktail. Pulse the processor blade only enough times to bring together the flour mix and liquid mix, this is where you really want to avoid overmixing. I think my dough came together in less than 10 pulses.

IMG_7203-Wrap the dough in plastic wrap and refrigerate for about an hour or more. Roll out as you need!

Now you can drink the remaining1/2 cup vodka/water/ice mix cocktail! This is where the optional olives come in. Be ready for a lot of great/obnoxious comments from your family

Peach Cobbler

IMG_72086-8 peaches, sliced
1 tablespoon sugar
1 teaspoon cinnamon
1 tablespoon tapioca (the small, dry, dessert pudding size of tapioca)
1 recipe of the above pie crust rolled out to about 1/8 to 1/4 inch thick
optional cinnamon sugar to sprinkle on top of crust (about 1 tablespoon sugar and 1/2 teaspoon cinnamon, mixed)

-In a bowl, mix peaches, sugar, cinnamon, and tapioca together.

-Butter a 9″ by 9″ glass pan (my favorite) and add peach mixture.

Extra dough on tray makes crusty cookies!

-Roll out dough, handling it as little as possible so it will not be tough, and slice or tear the dough into palm sized pieces to lay atop the peaches. No need to be fancy trying for a perfect 9″x 9″ crust, handle the dough as little as possible and your cobbler’s crust will be tender and flaky! Sprinkle cinnamon sugar mix on top of the crust for a nice finish, if you like. That is what I do.

Bake at 400 degrees for 10 minutes, then lover temperature to 350 for another 30 minutes. Let the cobbler cool for ten minutes, top with ice cream if that’s what floats your boat, and enjoy!

Half gone before we got a photo. Delicious!

Cheesy Crackers… because I’m Sick of Soup and Tea

Thought I’d try a recipe that I’ve had for a while, one for home made cheesy crackers… kind of like Cheez-its. My kids love those crackers and whenever they eat a lot of something, I like to see how a home made version might turn out. ChewOutLoud.com had a super simple recipe- four ingredients: cheddar, flour, butter, and salt. That’s it. I didn’t want to mess with a lot of ingredients or kitchenware with this crummy cold I have, but I’ve been bored with just TV and reading, I needed to create something. And of course, I had to make a few changes, so my recipe follows-

Four ingredients...
Four ingredients…

Cheesy Crackers

  • 1 1/2 shredded cheddar cheese
  • 3/4 cup flour
  • 4 tablespoons cold butter, cut up
  • 1/2 teaspoon salt
  • 1/4 teaspoon onion powder
  • 1/2 teaspoon Worcestershire sauce
Voilà- dough
Voilà- dough

Put all the ingredients into food processor bowl, and blend until the dough starts to come together- 30 to 60 seconds. Don’t overwork the dough, think of it as a cousin of pie crust and if it mixes too long the crackers will be tough.

dough disks
dough disks

Flatten dough into three disks, wrap in plastic and refrigerate for at least an hour.

almost crackers...
almost crackers…

Roll out the dough disks one at a time to about 1/8th of an inch thick and cut into squares of approximately one inch.

Place on baking tray, and poke the pre-crackers a couple of times with the flat end of a skewer (optional), and bake at 350 degrees for 15-20 minutes, until they start to brown lightly.

Finished!
Finished!

These were really tasty, but I think I still overworked the dough- 30 seconds was probably all the mixing it needed. Also, they are unbelievably greasy, until you think about how much cheese and butter there is to so little flour. Probably why they are so tasty, too!

If you have young kids, you really ought to try this recipe or a similar one. I bet they would really enjoy making their own cheesy crackers! Mine came out less crispy as store bought crackers, so I put them back in the oven for a bit longer- if you do this, watch out, they brown very fast.

New to the Grill- Garlic, Rosemary and Balsamic Marinated Lamb Chops

One of the family favorites here is bone-in pork chops. Nice, thick chops that always are too big to eat in one meal… The Girl and I have to save the leftovers for breakfast- forget your Wheaties, I tell you leftover grilled anything is truly the Breakfast of Champions! I had to learn how to grill lamb riblets from The Husband’s aunt, as my parents never served them. We will make them occasionally, these beautiful grilled lamb riblets, cut from a small, Frenched rack of lamb… yum!

But never have we grilled the diminutive lamb chops that we have seen in the butcher’s case. So, we made some tonight!

This was a very simple recipe we came up with after looking online for ideas-

Garlic, Rosemary and Balsamic Marinated Lamb Chops 
about five servings, two small chops per person

  • 2 1/2 lbs Lamb Chops
  • 1/4 cup Balsamic Vinegar
  • 1/3 cup olive oil
  • 1/2 teaspoon freshly ground black pepper
  • 1 teaspoon salt
  • 2 teaspoons chopped, fresh rosemary (or 1 teaspoon dried and crushed)
  • 6-8 crushed or minced garlic cloves

IMG_7013In a zip-top bag or glass baking dish, place the lamb chops and remaining ingredients. Rub the oil, vinegar and seasonings into the chops by hand or by squishing the bag around until the chops are well covered.

Refrigerate the chops in the marinade for two to eight hours.

IMG_7019Grill over medium-high heat for three to four minutes per side, less for rare, more for medium doneness.

We served this with roasted cauliflower, spinach and caprese skewers.

Wow, these were delicious! What a nice change form the usual pork chops or sirloin. Lamb is an ever so slightly gamey, meaty alternative. The meat was so very tender and the bone helped to keep the little chops from drying out on the grill. Did I mention how tender these were?

IMG_7022