“I Need to Eat Better” Soup- Lentil, Spinach, and Roasted Butternut Squash Soup featuring Something from Nothing Vegetable Broth

I’m trying to come up with a new soup recipe for dinner tonight.

Hopefully, this soup will be SO delicious, it will help be break my fried food (undeniably delicious) addiction. Yeah, I know this is asking a lot of a simple soup but Good Grief, I need some help! I consider it a monumental battle won if I can make it out of the Mexican grocery store with only the tortillas and produce that I intend to buy and leave the chicharrones behind. Many, many battles have been lost recently.

Sometimes a bit of good advice you once heard is all you need to start that ball rolling toward better habits (or if you are me, away from the french fries and onion rings). For example- I’ve heard that if you really want a great vegetable broth, you’d be smart to freeze vegetable scraps and make your own. Maybe a nice, homemade vegetable broth will help this new soup idea become a winning recipe.

Over about three weeks I have been tossing scraps into a bag that has sat in my freezer. That asparagus we grilled? The snapped-off ends went into the bag. In went the onion trimmings, parsley, spinach and mushroom stems, carrot peelings, as well as the  bits from the beets, cauliflower and broccoli we  boiled, roasted or sauteed. Everything finally found its way into the stock pot of water this morning to simmer along with a bay leaf, salt and pepper.

Hopefully, I will have a great base for tonight’s soup. In the meantime, my house smells great! Maybe that is a good sign…

Evening update:

Oh yeah, this soup is DEE-LISH! And it was definitely worth it to make that vegetable broth… The pre-cooked lentils from Trader Joe’s refrigerator section are better than if I made my own (I cannot seem to cook these properly… so frustrating). Combined with pre-chopped butternut squash that took only 45 minutes at 400 degrees to roast up all caramelized and tender, and finishing this soup with bagged baby spinach brings this soup into weeknight dinner speed.

I will make this soup again… Even if it isn’t as good as fried stuff. Like chicharrones.

img_3433
Don’t look at the squash- I left it in the oven too long. I said, “Don’t look!!” It still tasted great, though.

Lentil, Spinach, and Roasted Butternut Squash Soup

  • one onion, diced
  • 4-6 cups vegetable broth
  • 1 can or 1/2 of a 17.6 oz package of steamed lentils
  • 2 cups fresh spinach leaves
  • 1 lb uncooked, chopped butternut squash
  • 4 tsp olive oil, divided
  • salt, spices to taste

-Preheat oven to 400; on a baking sheet, toss squash with 2 teaspoons of the oil and sprinkle with salt and your choice of spices (I used curry and chili powder… it was great!). Roast squash for about 45 minutes or until soft but not mushy.

-While squash is roasting, cook onions in the remaining 2 teaspoons of oil in a medium pot over medium heat. Stirring frequently, the onions should become nice and caramelized by the time the squash has finished roasting.

-Once onions are lightly caramelized, add to the same pot the broth, lentils and spinach and bring to a simmer; add the squash when it is done roasting. Stir, adjust seasonings (needs salt, maybe?) and serve!

Makes about 4 servings of really tasty, really good for you soup, and it was very nice with toast and sliced fruit.

img_3428
My reward- about 4 quarts of vegetable broth

Want really good vegetable broth, too?

  • Throw vegetable scraps into a zip top freezer bag.
  • When the bag has a variety of trimming or your patience has had it with the bag of junk in the freezer, empty the bag into a large pot and cover with about one gallon of water.
  • Simmer for anywhere from one to four hours- another option would be to use a slow cooker for this job.


Recipe: Farro Stuffed Tomato on Arugula with Black Beans and Feta

I started running for one reason only. Well, maybe two:  second helpings of tacos and/or that extra glass of wine. Sidelined by two slight but nagging injuries and five pounds gained, I made this Farro Stuffed Tomato on Arugula with Black Beans and Feta to help steer my food-loving face toward better choices. Bit players on the plate include walnuts and julienned cucumber and red onion- YUM! This is a hearty, filling, flavorful lunch salad yet still a lighter meal. You know, like, if you’ve been eating too many tacos of late.

Farro Stuffed Tomato on Arugula with Black Brand and Feta- this was seriously holy freaking yum good.

Farro Stuffed Tomato on Arugula with Black Beans and Feta
for two servings

  • 1 large, really good tomato
  • 4 cups loosely packed arugula, well washed
  • 1 cup cooked farro
  • 1/2 cup julienned red onion
  • 1/2 cup julienned cucumber
  • 1/2 cup black beans, I used canned
  • 1/4 cup crumbled feta
  • 2 tablespoons toasted walnut pieces
  • olive oil
  • balsamic vinegar salt, pepper, herb blend (Penzey’s Parisien Bonnes Herbes blend is mighty good)

Cook farro according to package directions. I added salt, onion powder and garlic powder to my cooking water, and used the “put the grain in the pot, ad two or three cups of water, cook until tender, then drain off all the extra water” method.

While farro is cooking-

  • slice tomato in half along its equator, and scoop out the inside of the fruit. Dice the part that you’ve removed, and set aside
  • divide arugula between two plates and top each pile with a tomato half
  • sprinkle onion, cucumber, diced tomato guts, beans (rinse ’em off in water first),  feta, and walnuts evenly between the two servings of arugula

When farro is done (taste it… tender + done), drain off cooking water and while it is still in the pot, drizzle about one tablespoon of olive oil and half a tablespoon of balsamic vinegar over the grain. Mix in salt, pepper, and any herb blend at this point, too.

Fill each tomato half with the seasoned farro mixture. Drizzle arugula with a little more salt, pepper, olive oil, and vinegar and dig in!

Have you tried farro yet? It is one of the ancient grains that have been appearing in the markets recently. Along with quinoa and chia, farro has been cultivated for centuries, if not millennia. How does it taste? Well, I think of the grain as a larger, more mild and more tender version of barley.

It took a recipe this tasty to write up another blog post here on Branching Out on a Limb. I had intended to just snap a picture for my mom and tell her about my lunch creation, but the picture and recipe were too good not to share. This salad would also be great with beets, goat cheese, and pine nuts over romaine; turkey, dried cranberries, and hazelnuts over butter lettuce… please share your own great combinations!

New Recipe-Hasselback Potatoes Gratin à la Serious Eat’s J. Kenji Lopez-Alt

I intended to look up a scalloped potato recipe for tonight’s dinner with the whole fam-bamily, but got sidetracked by Facebook… Uh oh? No! The first things I came across was a New York Times Food link to one of one of my favorite food site people- J. Kenji Lopez-Alt from SeriousEats.com.

Hasselback Potato Gratin (“These Might Be the Best Potatoes Ever”)
Look at this glorious photo and click on it to link to theSeriousEats.com recipe (or click here: SeriousEats.comHasselbackPotatoGratin)

These were easy to put together with the cheese grating delegated to The Girl and potato peeling to The Husband. All I needed was my super-sharp chef’s knife (recently sharpened by my dad, thanks, dad!) to get super thin slices from my russets. Then I tossed them in the cream, salt, pepper, thyme, and garlic.

Here they are, half cooked at 400 degrees for thirty minutes, before they got shoved in a box and carted up to one of the in-law’s house:

(pretend that this is a picture of the half baked potatoes, use your imagination)

And here’s the nearly gone and mostly empty dish, the only pic I could snap of the potatoes that could net the least amount of ridicule from extended family:


These were DELICIOUS! These were unbelievably easy to prepare, travelled well half-cooked (unlike my extended family, LOLOLOL!!) and were gluten-free for the family members with Celiac to whom we wanted to show some kitchen love.

Put this recipe for Hasselback Potato Gratin on you list of new things to try next year.

Eggnog Sugar Cookie Bars

Eggnog-Sugar-Cookie-Bars-4-2
InsideBruCrewLife.com

I had high hopes for these bars. Wouldn’t you love a recipe that promises the flavor of a sugar cookie with all the ease of a brownie or a bar? This version from InsideBruCrewLife.com popped up on my Pinterest feed at just the same time that I wanted cookies to eat during a Star Wars marathon with the family. How convenient for me!

IMG_9794

With no egg yolks, cream of tarter, corn starch, cream cheese or sour cream, this very basic assemblage of ingredients were gathered (under the supervision of two-thirds of the household’s pets). Also adding to the ease of directions- no refrigerator rest time, no smushing with glasses dipped in sugar. I changed only a couple things by omitting the rum flavoring from the cookie dough and icing, and using less sugar in the icing.

william-bounds-nutmeg-grinder-c
click for WilliamsSonoma.com’s link for this good nutmeg grinder

Eggnog Sugar Cookie Bars
(as inspired by InsideBruCrewLife .com)

  • 1/2 cup butter
  • 1/2 cup brown sugar
  • 1/2 cup sugar
  • 1 egg
  • 1/4 cup eggnog
  • 3 cups flour
  • 1 teaspoon baking powder
  • 1/2 teaspoon salt
  • 1/2 teaspoon nutmeg- use freshly ground nutmeg for out of this world flavor!
  • In a medium bowl, combine flour, baking powder, salt and nutmeg. Set aside flour mixture.
  • In another bowl, cream butter and sugar until light and fluffy. Add egg, mix until combined; add eggnog, mix.
  • Add flour mixture to wet mix and stir until combined, but do not over mix.
  • Press dough into greased 9″ x 13″ baking dish and bake for 15 minutes. Let cool before frosting
IMG_9805
My nutmeg grinder… love it!

Overall, I’d say that we like these cookies. They definitely were super easy, and fast to prepare. They are not a substitute for a really tender yet crisp sugar cookie, though. Sometimes you have to go through those extra steps and use those slightly different ingredients to get exactly what you want. It will be worth it.

Eggnog Icing
Cream together until very light and fluffy one stick of butter and 2 1/2 cups of butter. Slowly add 1/4 cup eggnog and add 1/4 teaspoon nutmeg.
Makes more than enough to frost the above recipe


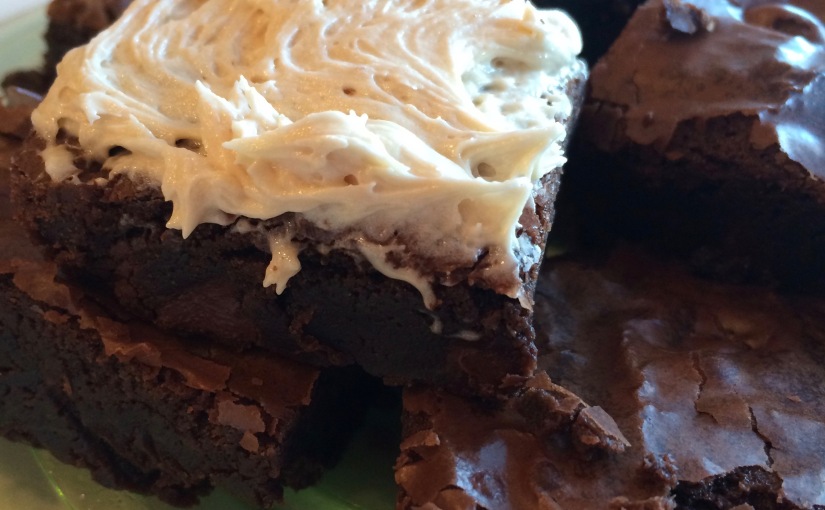
Irish Cream Liqueur Brownies- A Delicious Experiment and Two Recipes

All Costco’s Kirkland brand drinks seem to be great- the wines, the liquors, and now… how about this Irish Cream Liqueur? Into the cart it went since I couldn’t pass up the possibility of a good drink.

We have since tried it, and the Kirkland Irish Cream Liqueur is a winner! On ice and in coffee, The Husband and I have loved it. The Bunco Club has indulged and gave their approval, but the level in the bottle has still barely dropped.What am I supposed to do with an enormous bottle? It’s time to experiment because this is a seriously ridiculous amount of booze…

How about brownies? Yum.

IMG_9768


IMG_9737
The Ingredients

Irish Cream Liqueur Brownies

Oven at 350. Grease a 9″ x 13″ baking pan.

Into a large bowl put:

  • The brownie mix

Mix together in a small bowl or measuring cup:

  • 1/4 cup Irish Cream Liqueur instead of water (or amount of liquid as directed by recipe)
  • 1 teaspoon vanilla
  • 1 Tablespoon instant coffee crystals

Beat together in a medium bowl:

  • 1/2 cup vegetable oil (or as directed)
  • 2 eggs (ditto)

Stir together the liqueur and egg mixes, then slowly add all the liquid mix into the large bowl with the instant brownie mix. Add in chocolate chips now, if you are using them in your recipe. Stir until combined, but don’t over mix. 

IMG_9748Pour batter into prepared pan. Follow your usual baking directions, and in about 25 minutes you should be in Brownie Bliss!

I need about a half gallon of milk right now, or maybe a big mug of black coffee… or two. I just tasted my brownie concoction and WOW. Very sweet, but Very good. I think that the brownie mix could have stood another tablespoon or two of liqueur, as the batter was not only more stiff than when usually made with water, but also- the Irish Cream Liqueur flavor is pretty mild.

Irish Cream Liqueur Icing (makes about 1 1/2 cups icing)

  • In bowl of stand mixer, slowly beat together one cube of butter, two ounces cream cheese(1/4 of an 8 oz. block) and two cups powdered sugar. Beat on high speed for three to four minutes until light and fluffy.
  • Stop the mixer and add one teaspoon vanilla and 1/4 cup Irish Cream Liqueur. Mix again, on low speed until combined, then high again for one to two minutes.


My Baking Notes:

-I used my family’s favorite boxed mix as a base and added my not-so-secret ingredients (instant coffee, vanilla, and chocolate chips). Remember, if you are going to use instant coffee crystals to punch up the chocolate flavor, you must add the dry coffee to the water/vanilla/liqueur and NOT directly into the batter, or they won’t dissolve.
-If you mix together all your liquids before stirring them into the brownie mix, you are much less likely to over mix the batter.

Bonus Tip!!

Ever hear that if you slice your brownies with a plastic knife, that they will slice more evenly and not get all ragged? Well, it is true.

IMG_9749
Metal knife vs. …


IMG_9750
…plastic knife (see the difference?

Yep. It works, slice up your brownies with a plastic knife from now on, everyone!

IMG_9754 (2)

IMG_9757 (1)